Springy Whites-as in the season, not the swirly metal thing!

Posted by csdferwEHRTJR Selasa, 26 April 2011 0 komentar

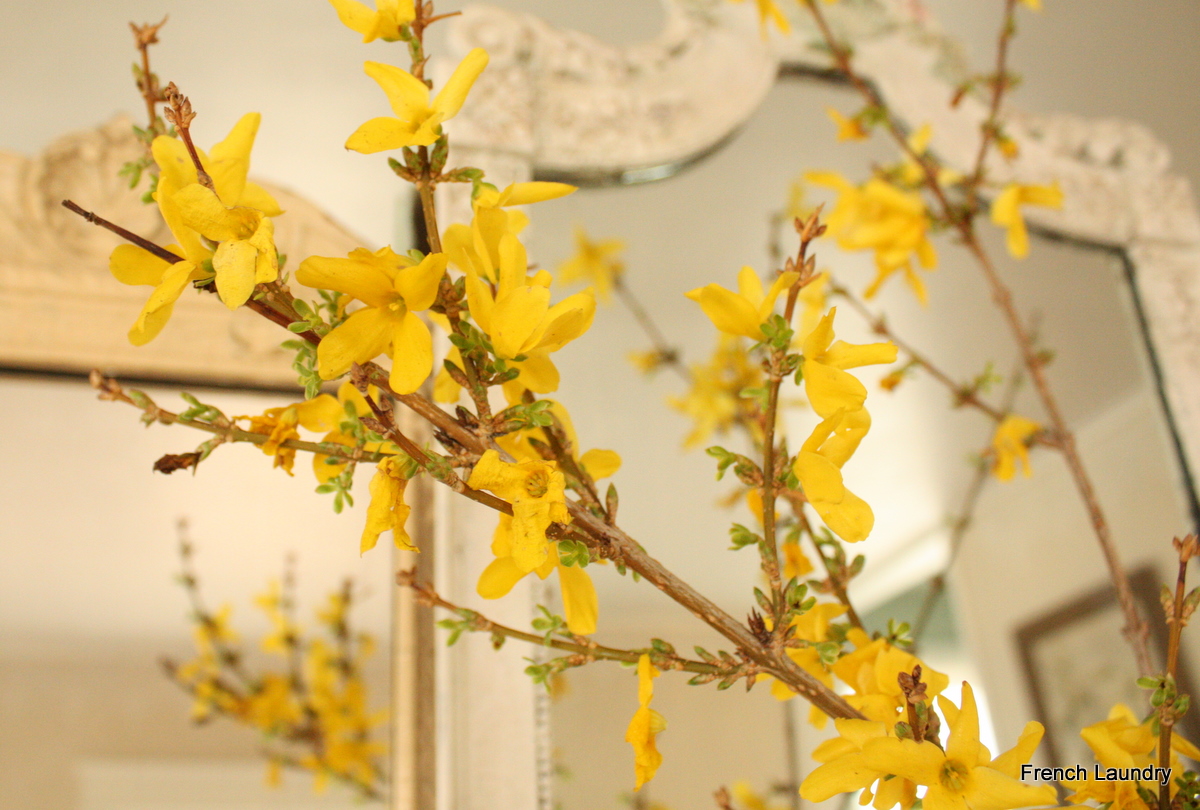
WOW!  Where does the time go?  I've been MIA for 2 weeks...how did this happen?  Been taking care of business, it is true, but I sure never intended to miss out on this much out in Blogland.  Do know that I've been popping in and visiting a little, even if I haven't commented, but for the most part, I'm trying to stay focused on the daunting tasks at my house...organizing, purging (ruthless, I tell ya), planning, and trying to get out of a storage area that we have been paying for for way too long.  I know you all have been there as I have followed your blogs, but sometimes it feels like it will never end, doesn't it?!  Oh well, at least I've made a bit of progress.  Any WHO...here in Colorado, we are just now starting to see spring.  My forsythia bush is almost bloomed out, but I got one little vase of pretties for Easter Sunday.  The crabapple trees are all popped out in full force although the one in our yard is a little later to bloom.  Tulips have come up, and my husband is spending hours in the yard doing clean up (a sure sign spring is here).  We had a smattering of snow on Easter Sunday, but that's just how we roll in these parts.


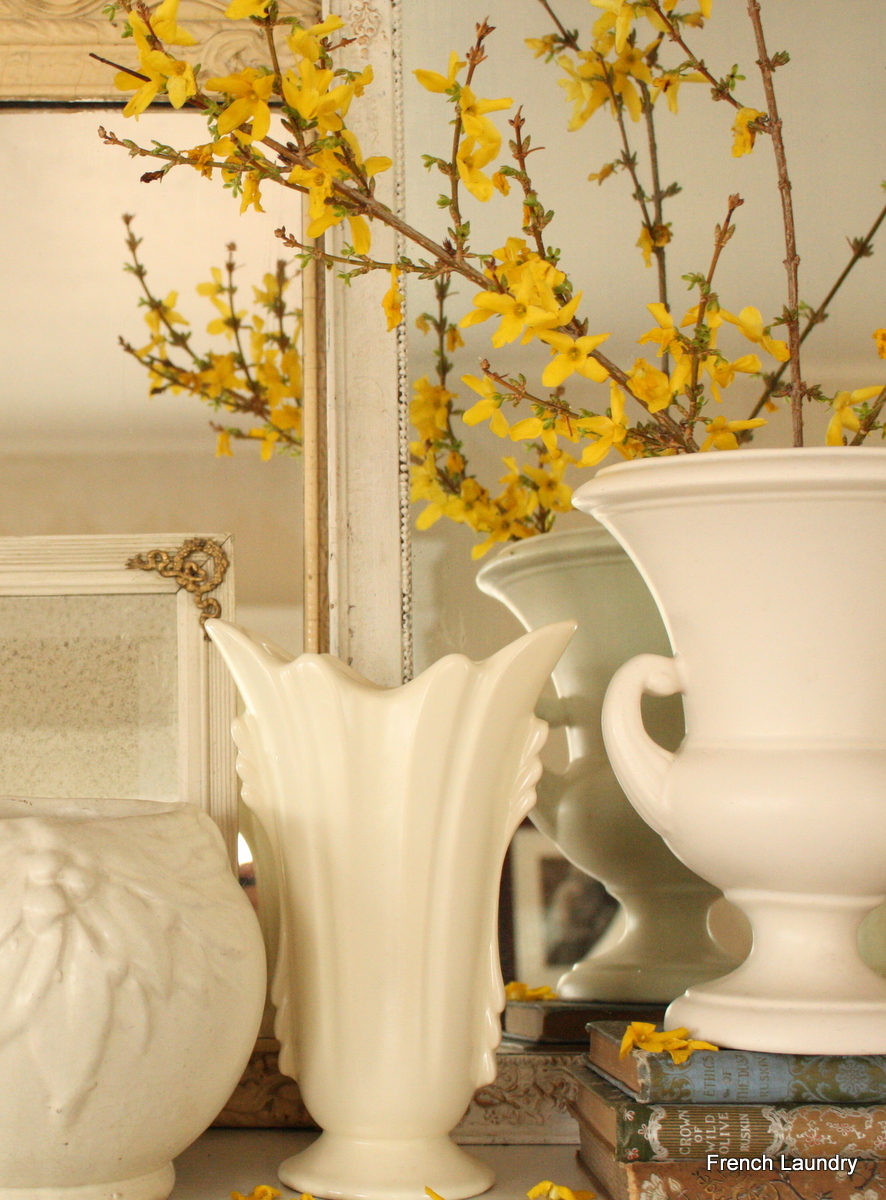
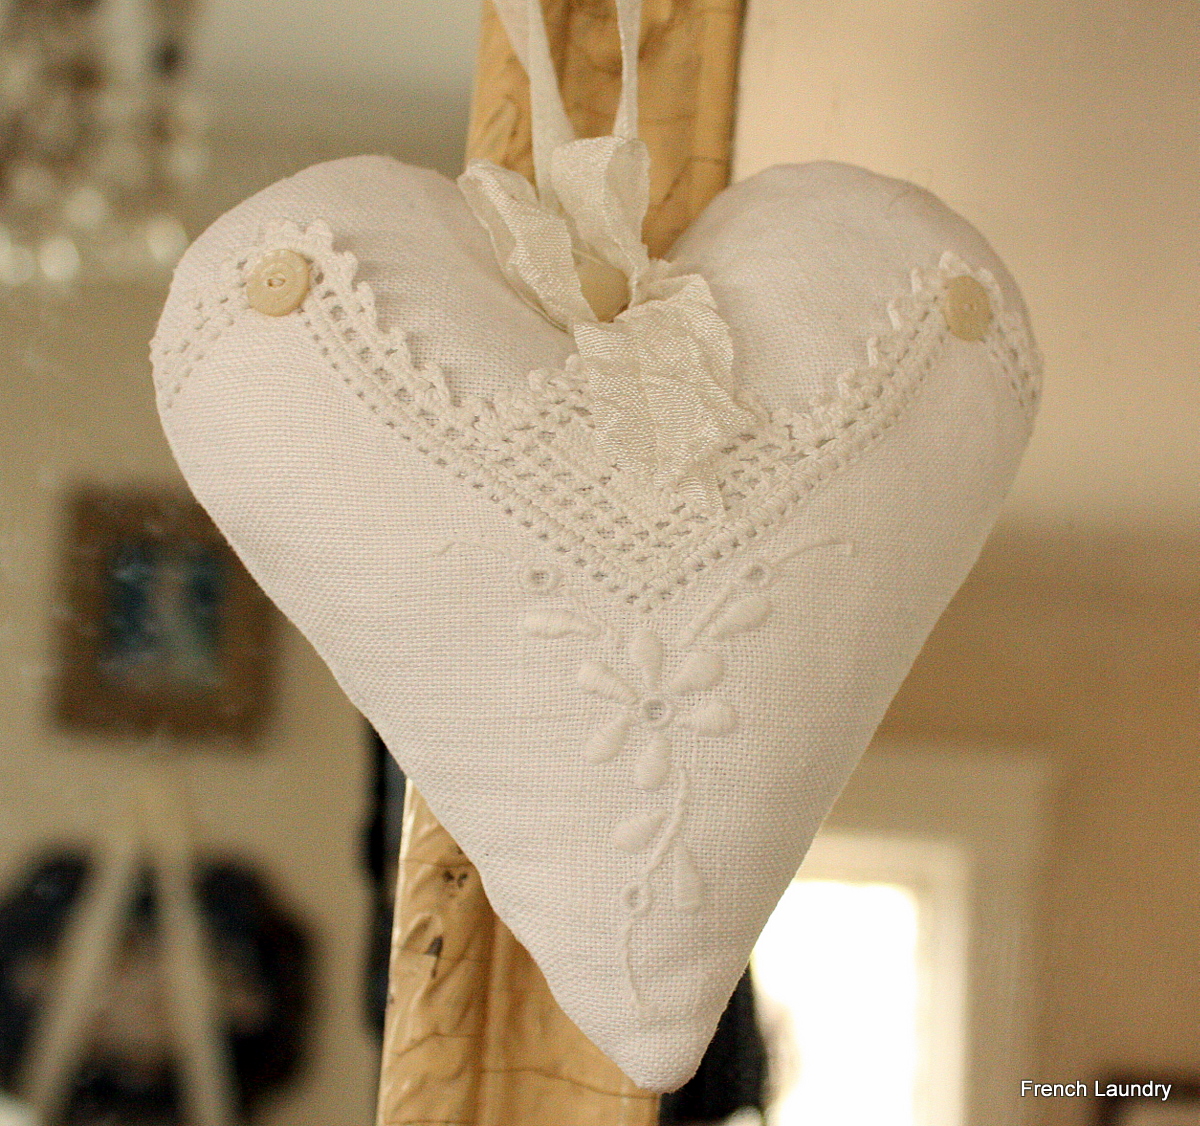
I have to admit, I liked the way the fallen blooms looked on the mantel, so I didn't move them.  This incredible little lavender sachet was made from an old linen doily or something.  I got it on Etsy from a lovely seller, Bailiwick Designs

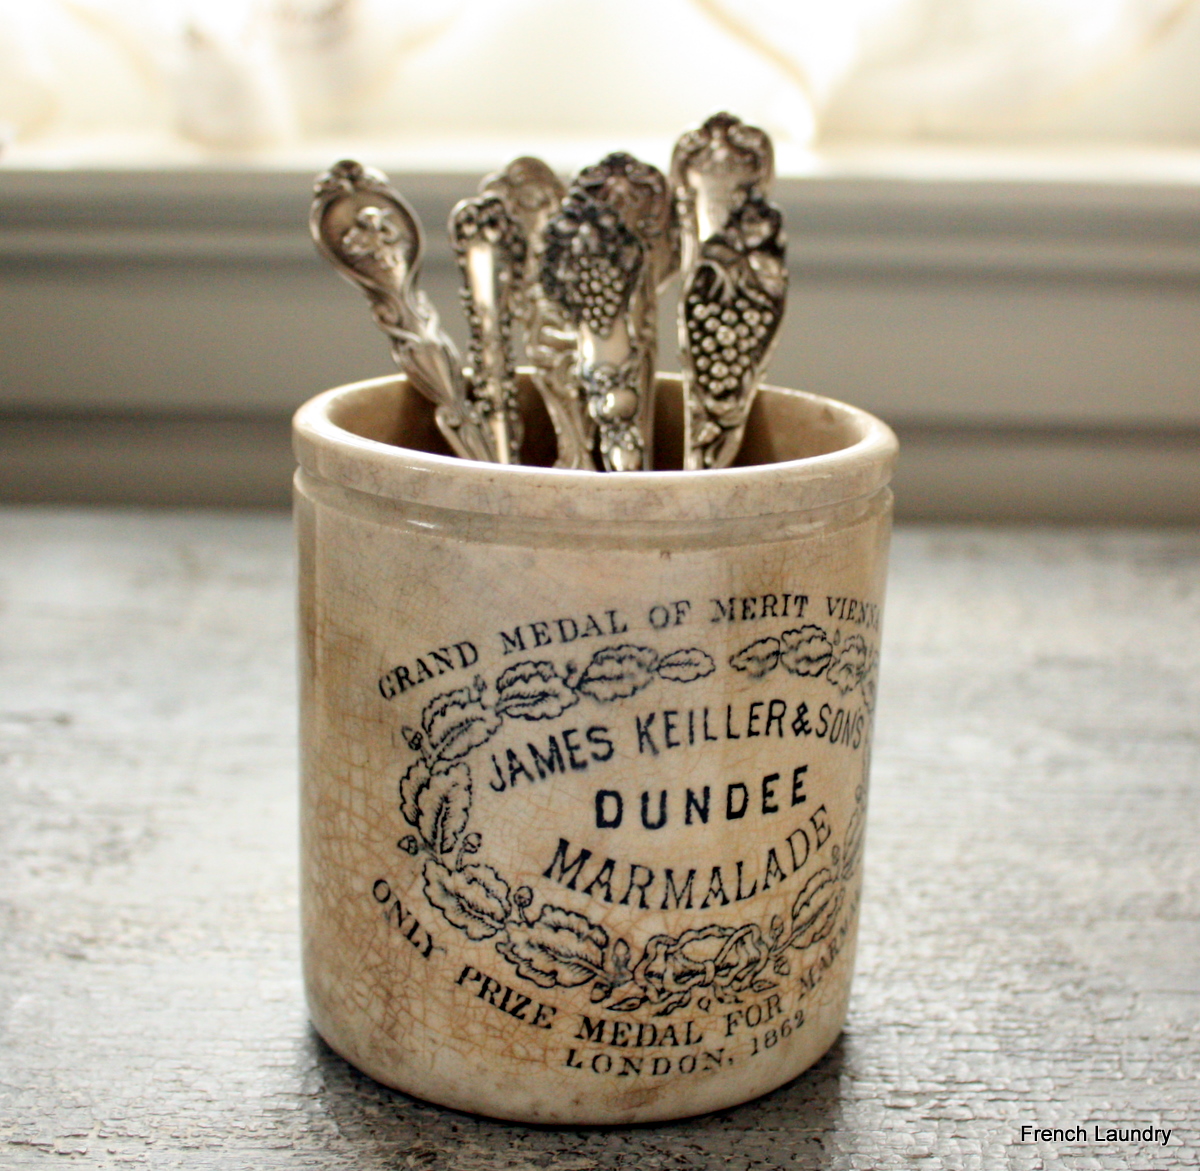
I just listed this little cutie antique marmalade crock on my Etsy shop today.  I LOVE the crackle and the color.  Perfection...the next 2 photos are also things available at Elegant Farmhouse.

Since I am sadly behind in the Easter show and tell department, I have to show you some of my pretty "Easter Egg" blown eggs. I put mine in an antique white ironstone compote and they are just so serene looking.


I loved this zinc carrier so much, it almost didn't make it into the shop, but if you go back to my first paragraph about sorting, purging, downsizing...well, you get the idea.  It HAD to go up for sale. But my daffodils in the old milk bottles sure looked sweet.  Very Romantic Prairie Style, don't you think?


Speaking of Romantic Prairie Style, if you haven't sent me your pictures for my "Show Me Your Romantic Prairie Style" photo challenge, you still have until Saturday night, April 30th to enter.  Just click here for the details.  When all is said and done, one blogger will win a copy of Fifi's divine book, "Romantic Prairie Style".  Plus, the 5 finalists will be the subject of one of my blog posts with lots of ooohing and aaahing to be done by all!  Join in the fun-you can send new photos or ones that you have in your archives as long as they are YOUR home, garden, or studio.  Let me see your interpretation of this beautiful livable way of decorating.  Don't worry if you think your style is a little outside the box.  If you've seen the book, you know that this style runs the gamut from French fancy to farmhouse minimalist and everything in between.  The main thing is to SHOW ME YOUR STYLE and HAVE FUN!


I'm sharing this post with Kathleen's White Wednesday over at Faded Charm. Come on over and get overloaded on the dreamiest whites around.

Until next time,


Baca Selengkapnya ....

Cargo Color Eye Shadow Palette in Baja

Posted by csdferwEHRTJR Minggu, 24 April 2011 0 komentar
New fav status.

Love this palette. Love how simple it is. Love the pigmentation of the colors.

Don't really love the brown on the lower right... It's nice, but throughout the day, it can start looking a bit orange. Which is great for some looks. That still doesn't ruin it for me because the rest of the colors are awesome.

So perfect for creating more natural looks for Spring!

**So many of you noticed me wearing this palette over the past month in videos! I received so many requests for a tutorial and questions about what I was wearing that I created a simple Spring tutorial using this palette to show you how I wear it.
Click here for how I created the look (blog post).
...or here to go straight to the YouTube video.


xoxo-
Tiffany

Baca Selengkapnya ....

Spring Natural, Glowy Makeup: New Fav Palette

Posted by csdferwEHRTJR 0 komentar
Just a super-easy, natural, fun look for spring using one of my favorite eye shadow palettes I've recently discovered. Hope you guys love it!
*Click here for photos and swatches of the palette.

Products Used:
Cargo eye shadow quad in Baja
MAC Fluidline in Dipdown (brown)
Covergirl Lashblast Volume mascara
NARS Laguna powder bronzer
NARS Orgasm powder blush
NARS Easy Lover lipgloss

not shown in video:
Make Up For Ever Mat Velvet+ liquid foundation with Beautyblender


Baca Selengkapnya ....

Nails: Chanel Mimosa

Posted by csdferwEHRTJR Sabtu, 23 April 2011 0 komentar


Yellow is probably the color least-worn on my nails. My opinion has always been:"Yellow and nails just don't mix".

Until I saw this color by Chanel and caved.


Spending $25 on a nail polish is usually a practice I reserve for the crazies (you know you're reading this...), but I've been known to lose my mind from time to time.

Mimosa by Chanel is a lemon-yellow with a golden frost to it. The frost isn't too intense though. From a distance, you wouldn't even notice it. I'm not too crazy about the formula. Of course, two coats is the way to go. However, with two THICK coats, it still looked a bit streaky in spots and the whites of my nails still show through a bit.

Overall, if you have a little patience with the formula, it's a fun and unexpected twist on nail color for Spring!

Baca Selengkapnya ....

Eyeliner Howto: Tightlining Technique, the Waterline & Favorite Products

Posted by csdferwEHRTJR Sabtu, 16 April 2011 0 komentar
Eyeballs make me cringe. Seriously. I can sometimes just imagine getting poked in the eye or something crazy happening to my eyes and I almost throw up. True story.

Because of this, lining the waterline and tightlining were always something I stayed away from up until a couple years ago. It just seemed dangerous, unnecessary, and gross.

I'm so glad I gave it a shot, practiced, and have discovered some great fool-proof products over the past few years because I absolutely love the results.
So to show you what "tightlining" and lining the waterline really mean, and how to get great results, I figured I'd make a handy dandy little video tutorial.

...One that didn't make it seem dangerous, unnecessary, and gross.
Because I still cringe whenever I see someone else do it.

If you have sensitive eyes and want to try this technique, make sure you stick to the tips I give in the video and choose safe products that are safe for use in that area. Also, maybe just skip the waterline and start with tightlining.
Check out the video below for a description of both and a tutorial/demonstration of these lining techniques.


Baca Selengkapnya ....

Updated Foundation Routine (BeautyBlender)

Posted by csdferwEHRTJR Rabu, 13 April 2011 0 komentar

So during my last skincare haul video, I mentioned the BeautyBlender sponge makeup applicator at some length. I had gone to the store looking for a generic makeup-removing facial cleanser to clean it with which then inspired the whole change in my skincare routine.

Which then inspired a long ramble in that video about my love for the BeautyBlender...

So as promised in that video, here is my updated foundation routine using this product.


Here are some BeautyBlender basics to remember:
-Always use the sponge damp. It expands to almost twice it's size and makes it much softer and springy..er. :) Dampening it really is what makes the product worthwhile and keeps it from soaking up (and wasting) most of your foundation like most other sponges.
-Apply your foundation using bouncy motions. (I demo this in the video)
-Clean it every 3 or 4 times using a gentle cleanser.

BeautyBlenders are available at sephora.com.


Baca Selengkapnya ....

Playing with Sophisticated Finishes Patina Solution

Posted by csdferwEHRTJR Selasa, 12 April 2011 0 komentar


A few weeks ago, I was shopping at a little junque shop in town.  I say junque because junk is a bit harsh, but antique is a bit of a stretch.  I saw this little metal terrarium thing complete with candles and silk flower bits (I appreciate the thought, but not so much the outcome).  I didn't buy it first time around, but then a couple of weeks, went back and decided it just needed to come home with me.  AND I needed to do a little fussing with it until it was more rusty crusty and full of character.  Below is what it looked like when I brought it home.

Before, as purchased.  Not bad, just not me
I have used this product before and like it a bunch.  It is Sophisticated Finishes and it can be found at Michael's.  It comes in a bunch of different finish options and is a 2 step process.
This set gives an aged copper patina
First you paint on the base coat.  I had the aged copper kit, so the first step made everything deep copper metallic color.
After the first step of the process.  Copper metallic finish.


Then, you add the patina liquid and let it sit.  I did a lot of dappling with a sponge brush and just let it run wherever.  As you might guess, the tray got the best of the patina since it is flat and the liquid doesn't run off.  If you like "extra crusty", you can toss a little salt in the mix and it does a bit of the pock thing.  Kinda cool.
After the second "patina" step has been added. 
I liked it, but it was a little too orangey for the look I wanted, so I got on line and found out that Sophisticated Finishes also has a kit that is iron and rust.  Since I used up the last of my copper patina on this project and I had a coupon for 40% off at Michael's, I decided to replenish my rusty crusty maker stock with the iron and rust.  I then dabbled on both steps so I wouldn't completely obliterate the coolness of the finish I already had, but I could just tone it down a bit. Below is the result.
After adding dabs of the Iron/Rust set
I like it.  Funny how sometimes it just takes a little more layering before you're happy with the result.

Then came the fun part of putting some stuff in the structure.  I printed off some stuff from the Graphics Fairy and decided on the Birdie Darling sheet music cover.  I added an actual bird's nest which was abandoned in one of my Christmas wreaths one year, put in some Quail eggs, a little lace scrap to soften things, a crusty old finial, and the cute little porcelain bird which was on clearance at Michael's (OK, yes, impulse buy, but I did resist the first time I saw it and only bought it the second time around, so I think I get a little credit!).  I'm not sure I'm totally happy with the inside vignette yet, but the fun thing is, I can play until my heart is content now that I have it looking the way I wanted.  I like that now it isn't so obviously new like it was before.  Rusty and crusty and a little elegant.  Ahhhhhh, PERFECT!  And, pretty easy as well.  If you like to alter stuff to look like old metal, I think the Sophisticated Finishes do a pretty good job.  The kit runs around $12, but you can get several small projects out of it and, of course, if you use a coupon, it is much more reasonable. 

Filled with fun "junk"

It has cute little ball feet although its just balanced on my architectural piece right now.

I'm linking up with Kathleen's White Wednesday over at Faded Charm and Debra's Vintage Inspiration Friday.  Stop on over and get filled up on eye candy galor!

Don't forget my Romantic Prairie Style "Show Me Your Style" Photo Challenge that you can enter for a chance to win your very own copy of the fabulous Fifi's Romantic Prairie Style.  Read about it here.  Hope you gals don't mind, but I'm pushing back the deadline to enter the challenge to April 30th.  We all need more time, right?  Or maybe that's just me...smile.

Until next time,

Baca Selengkapnya ....

My New Office! (Photo Tour)

Posted by csdferwEHRTJR Minggu, 10 April 2011 0 komentar
4.10.11
If you all follow both of my YouTube channels, MakeupByTiffanyD and TiffanyDtv, then you know that during the past few weeks I've been working on a little project in the room I film in. Well, I guess a little project that turned into a big project, that ultimately resulted in a very stressful trip to Ikea. But it was all very worth it! Over the last couple weeks, I've shown you little bits and pieces of the new room, info on the furniture, and shared the progress with you all here and there in random videos.
Now it's (almost) finished and decorated. ...and yes, I actually found something to put inside of all those shelves! :)
In the next day or so, I'll be posting a tour of the new room on one of my YouTube channels.
I've been enjoying the new space SO much. Not only is it beautiful, but it's so practical. I finally have an office space of my own and a TON of extra storage for all of my office-y things.
Here is a little peek of the new room for you all!


The new furniture strangely made the tiny room feel much more spacious...
Bookshelf: Hemnes storage combination (Ikea)
Desk: Liatorp desk (Ikea)
All mirrored furniture: Hayworth collection: Jewelry Amoire, Lingerie Chest, Vanity table with Mirror and Bench (Pier 1)

Still need to find a great chair. Until then, my lil' wire-y one will have to do.

Added a new super girly chandelier... why not. (Home Depot)

The storage in this desk is AMAZING.
Awww at the poor lil' wire-y chair...haha. That's the only thing left to find! The perfect chair.
If you're interested in my pink keyboard cover, I got mine on amazon.com.

In the process of getting a glass topper for the desk. I'm paranoid about ruining it before then.


Spruced-up my little bookshelf. It used to be my Papaw's- he kept his records in there. I painted it white. I decided to add some short cafe curtains to cover the clutter inside. The top shelf houses my nail polish collection. The bottom shelf holds random books.

The new shelf is great for photo storage- From my photo boxes to framed ones to display...

One of my favorite wedding pictures. Brad is not in it though...lol
To-do: Find wedding picture to display in office that actually has husband in it.


Added a new lamp from Target...


And yep, my makeup/filming area stayed just the same!


aaand this is how I work... Still haven't decided if I'm a PC or a MAC. :/

-xoxo-
Tiffany

Baca Selengkapnya ....

New Skincare Haul: Ulta & Target

Posted by csdferwEHRTJR 0 komentar
When something works (especially skincare), I stick with it. Well, I got bored. Here is the result.


Baca Selengkapnya ....

Pretty Statue Makeover

Posted by csdferwEHRTJR Rabu, 06 April 2011 0 komentar
Hi Blogger Friends,

A week or so ago, I posted about some of the finds I got while out antiquing and one of them was this little fella.  He was so cute with his little ivy wreath crown and bird's nest, but he was painted an old gold.  I love old gold on some things, but on him, not so much.  Don't get me wrong, if for some reason, I could only have purchased him with the agreement that he had to stay as is, I still would have picked him up, but luckily, that was not a stipulation of purchase!  Like so many of you out there, sometimes, we just think, "but I could make it so much BETTER..."  And off we go, paintbrush in hand.  Here's what he looked like when I got him.


I had wanted to leave a little of his gold peeking through.  Hmmmm...I painted him all a watered down white and then wiped some of the paint off.  YUCK!  That wasn't even photo worthy.  He ended up in the sink with me and a brillo pad.  Back to the original...after numerous coats of a little white paint mixed with a little walnut glaze, then watered down walnut glaze to go down in the cracks, he ended up looking a bit like an old bronze statue.  I kind of liked him, but when I got up this morning, that old painting jones got the better of me and I got back at it before I even ate breakfast (or got dressed for that matter-I know, it's a sickness).  I wanted him lighter.  After a little more white paint mixed with a little glaze, ragged on, I sort of liked him, but he was a little chalky looking and the walnut glaze in the cracks seemed a bit too...well, wal-nutty.  SO, add some black paint to the watered down concoction and drippled that all over and then wiped if off the surface, just leaving it in the cracks.  Better.  I think we're getting there.  This is the result.


In this picture, he looks a tad zombie-ish, so I think he may get a little more dabbing of color in his face.  Tweaking, tweaking, always tweaking...sigh.


Overall, I think I'm happy with him, but there's always room for improvement, right?

Don't forget to enter my ROMANTIC PRAIRIE STYLE SHOW ME YOUR STYLE PHOTO CHALLENGE.   Click over to that post to get the low-down and send me your take on the romantic prairie style.  You never know...you may be in fabulous Fifi's next book!  No, I don't have any inside information, no I do not know if she has another book planned, but nothing ventured, nothing gained.  One thing I can say for sure, the winner will receive a copy of Fifi O'Neill's stunning new book, Romantic Prairie Style.  Archive photos are fine, you don't have to snap new ones, as long as they are YOUR personal photos of your home, garden, or studio.

Linking up with Kathleen's White Wednesday.  Pop on over for some great white inspiration.

Until next time,


Baca Selengkapnya ....

Dark & Dramatic "Going-Out" Eyes- Naked Palette

Posted by csdferwEHRTJR Selasa, 05 April 2011 0 komentar

Products Used:
Urban Decay 24/7 Eye Shadow Pencil in Sin
Urban Decay Naked Eye Shadow Palette Colors:
Buck
Toasted
Hustle
Darkhorse
Creep
Virgin
Smog
Sidecar
MAC Fluidline in Blacktrack
Covergirl Lashblast mascara
MAC lipstick in Ravishing
MAC Mineralize Skinfinish in So Ceylon (as bronzer)
Tarte Amazonian Clay blush in Exposed
*Don't forget your Sigma Makeup brushes! Click here to get some of your own!


Baca Selengkapnya ....

We have a winner...AND a Romantic Prairie Style Photo Challenge

Posted by csdferwEHRTJR Sabtu, 02 April 2011 0 komentar

Today is the day, yessirree...we have a winner of Fifi's fabulous new book Romantic Prairie Style and one of my little lavender sachets. AND I have something exciting to tell you at the bottom of the post, so bear with me.


Thank you to all who entered and became followers and tweeted and posted on Facebook.  I wish I had a book to give all of you, but I don't, so we'll just have to congratulate the nice gal who's "number came up".
Mr. Random Number Generator came up with the number belonging to....


RECYCLED RITA!

I'll be contacting you Karen for your mailing address so I can ship you your treasures.  YAY!

Now, for PART DEUX.    I am pretty excited about this and I hope you are too.  Today on my doorstep, the mailman brought me a SECOND copy of Fifi's book.  Yep, a second one.  Now, at first I thought I'd just have the random number generator generate two numbers.  BUT, that would be too easy.  I thought perhaps we could have a little fun and promote one another as well.  SO, here is my idea:

**********************************************************************************

Between now and tax day for us in the U.S. (April 15th-SHRIEK!), send me a photo from your home, studio, or garden that you feel best represents your take on romantic prairie style.  It can be a vignette or a room photo, whatever you prefer, just send me a file size that is suitable for posting in the XL Blogger picture format because that is the size I like to show on my blog so everyone can see your beautiful details if you are a finalist.  I will pick the 5 entries that I feel best embodies the romantic prairie style and do a post on my blog featuring YOU and your wonderful personal spaces with links to your blogs or websites.  THEN, those 5 people will have their names thrown in the hat and the winner will receive Fifi's book.  Now if you already have Fifi's book, you could give this one as an AWESOME gift and look like a rock star (don't worry, we won't spill the beans that you got it for free!).  Please don't feel that you can't enter just because you don't "need" the prize.  I really want to see your pictures, whether they are brand new or from your files.  Feel free to send up to 3 photos since, if you are like me, you will be torn as to which is the "perfect" one.  Now you don't have to decide.  Also, please don't stress out about your photos.  We are just having fun and that's what its all about.  By entering, you do, of course, imply permission for me to post your photo on my blog should you be a finalist.


My only rule is this:  these MUST be your OWN photos.  No magazine inspiration photos or photos from FLICKR, etc.    Go forth and get those cameras clicking and show me what ya got!  Let's have some fun with this.   If we are a little sluggish getting started, I do reserve the right to push back the end of the contest so we have enough to play.

Send your photos to the email address posted on my sidebar.  It is not a direct link because I don't want the automated bots to fill up my inbox, so sorry for the extra step.  I will send you a very brief confirm that I got your photos.
Spread the word by posting about the contest on your sidebar.  Here's an image you can use if you like, and please link it back to THIS POST so people can find out the details.  


 Until next time,


Baca Selengkapnya ....
Trik SEO Terbaru support Online Shop Baju Wanita - Original design by Bamz | Copyright of wallpaper emo.